A protein skimmer removes dissolved organic waste before it breaks down into nitrate and phosphate. In most reef tanks, it improves water clarity, boosts gas exchange, and adds a useful margin of safety. The best results come from proper sizing, stable water depth, and patient tuning.
Many reef keepers buy a skimmer early. Fewer understand how it actually works. That gap causes common problems. Some hobbyists run a skimmer that is too large. Others place it in the wrong sump chamber. Many chase foam level every day and never let the unit settle. This guide explains the basics in plain language. You will learn what a protein skimmer does, when you need one, how to choose the right model, and how to tune it for consistent performance. I will also cover setup, maintenance, common mistakes, and troubleshooting tips that apply to beginner and intermediate reef aquariums.
Quick Reference Table
| Topic | Recommendation |
|---|---|
| Best use | Mixed reefs, SPS tanks, heavier bioload systems |
| Tank size matching | Choose a skimmer rated close to your real water volume |
| Ideal sump depth | Usually 7 to 9 inches, based on manufacturer guidance |
| Break-in period | 3 to 14 days is common |
| Collection cup cleaning | Every 2 to 4 days for stable foam production |
| Full body cleaning | Every 1 to 3 months |
| Wet skim | Removes lighter waste faster, fills cup sooner |
| Dry skim | Darker waste, slower collection, less saltwater loss |
| Best placement | First sump chamber or stable-depth skimmer chamber |
| Main benefit | Organic export, oxygenation, and improved water quality stability |
What a Protein Skimmer Does
A protein skimmer uses foam fractionation. That sounds technical, but the idea is simple. The skimmer mixes aquarium water with many tiny air bubbles. Organic compounds stick to the bubble surfaces. Those bubbles rise into the neck and collection cup. Waste then leaves the system as dark liquid and sludge.
This process helps remove dissolved organics early. That matters because those compounds later break down into ammonia, nitrate, and phosphate. A skimmer will not replace water changes. It will not fix overfeeding by itself. It also will not remove every nutrient. Still, it is one of the most useful filtration tools in reef keeping.
Skimmers also improve gas exchange. That can raise oxygen levels and help stabilize pH, especially at night. Tanks with many fish benefit the most. Densely stocked coral systems also respond well. If your reef runs warm or has limited surface agitation, the oxygen boost can be very valuable.
Do You Need a Protein Skimmer?
Not every saltwater tank must have a skimmer. Some nano reefs run well without one. Lightly stocked systems can rely on regular water changes, strong biological filtration, and careful feeding. Soft coral tanks sometimes prefer slightly richer water. In those setups, a skimmer can be optional.
For most reef tanks, though, a protein skimmer is worth using. It adds stability. It gives you more room for feeding mistakes. It helps when fish load increases over time. It also supports cleaner water in SPS systems that demand consistency.
I strongly recommend a skimmer for tanks with several fish, heavy feeding, messy eaters, or expensive corals. It is also very useful if you travel often. A skimmer will not make the tank maintenance-free. It does make the system more forgiving. That matters for beginners. It matters even more during the first year, when feeding habits and stocking plans often change.
Types of Protein Skimmers
The most common reef skimmer today is the needle-wheel design. It uses an impeller that chops air into fine bubbles. These models are efficient, quiet, and easy to find. They work well for most home aquariums.
In-sump skimmers are the standard choice. They sit inside the sump and are safer if they overflow. Hang-on-back skimmers work for tanks without a sump. They can perform well, but placement and maintenance matter more. External skimmers exist too. They are usually used on larger systems. They save sump space, but leaks are a bigger concern.
You may also see air-driven or venturi skimmers. These are less common in modern reef setups. They can still work, but most hobbyists prefer newer needle-wheel models for ease and performance. For beginners, an in-sump needle-wheel skimmer is usually the best mix of simplicity, reliability, and value.
How to Choose the Right Size
Skimmer sizing confuses many hobbyists. Manufacturer ratings are often optimistic. A skimmer labeled for 150 gallons may be ideal for a moderately stocked 75-gallon reef. Always think about real water volume, not just display size. Rock, sand, and sump layout reduce total water volume.
Bioload matters just as much as gallons. A tank with two clownfish needs less skimming than a reef with tangs, anthias, and frequent coral feeding. If you keep SPS corals and feed heavily, choose a model with some extra capacity. If you run a soft coral tank and want nutrients available, avoid extreme oversizing.
An oversized skimmer can be frustrating. It may struggle to build a stable foam head in a lightly stocked tank. That leads to inconsistent skimmate and endless adjustments. A slightly oversized model is fine. A massively oversized one often performs worse. Match the skimmer to your current system and your realistic stocking plan for the next year.
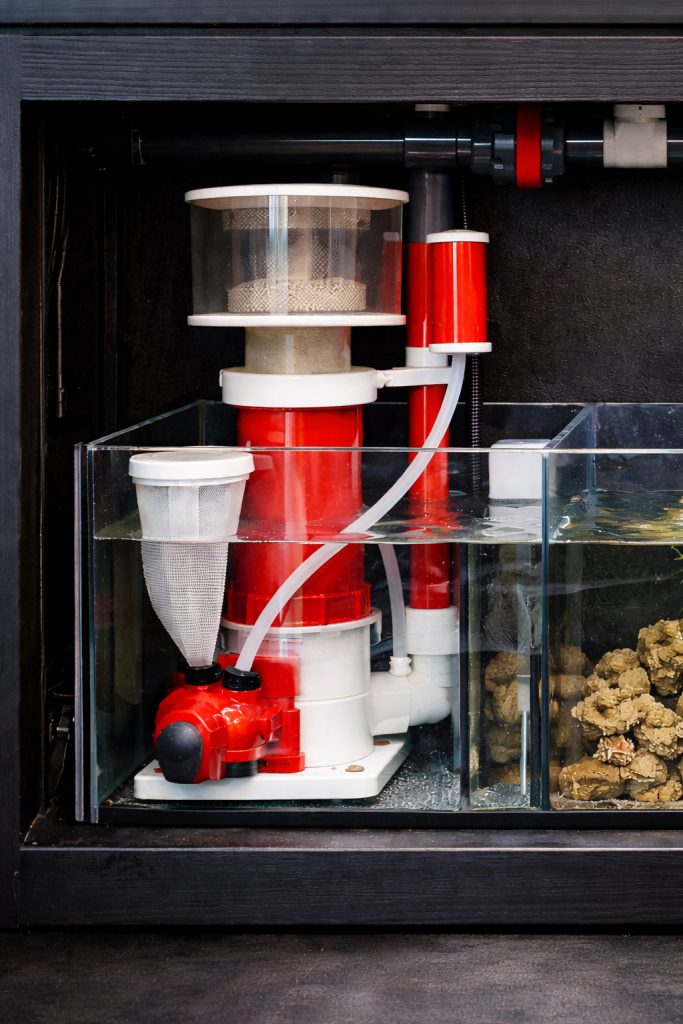
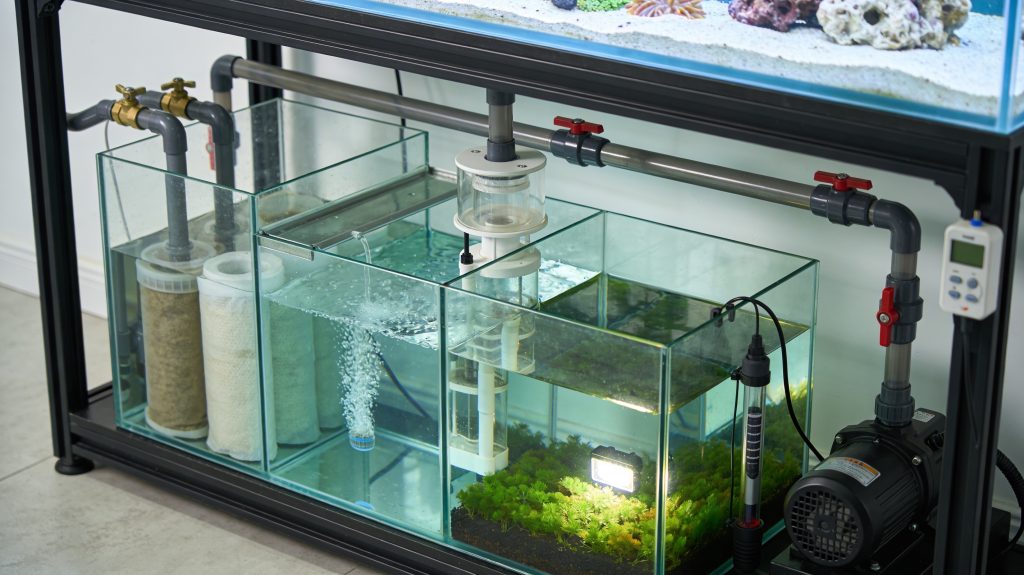
Aquarium Setup and Placement
Place the skimmer where water depth stays stable. This is critical. Most skimmers work best in a specific depth range. That range is often 7 to 9 inches, but always check the manual. If the water level rises and falls, the foam head will change all day. That causes weak performance or random overflows.
The best location is usually the first sump chamber or a dedicated skimmer chamber. That area receives nutrient-rich water from the display. It also keeps the skimmer before return pumps and reactors. If your sump depth is too high, use a skimmer stand. This raises the body to the proper operating depth.
Keep the outlet unobstructed. Back pressure can change internal water level. That affects skimming consistency. Also leave enough room to remove the cup easily. If cup removal is awkward, maintenance gets skipped. That hurts performance over time. Good skimmer setup is not just about fitting the body. It is about making stable operation and easy cleaning possible every week.
Step-by-Step Protein Skimmer Setup
Set up a new skimmer slowly. Rushing usually causes frustration. Use this simple process for the best start.
- Rinse the skimmer body with warm water. Do not use soap.
- Assemble the unit exactly as the manual shows.
- Place it in the sump at the recommended water depth.
- Open the air intake fully unless the manual says otherwise.
- Set the outlet or gate valve to a low, conservative foam level.
- Plug it in and let it run without constant adjustment.
- Expect a break-in period of several days.
- Raise the foam level slowly after the break-in period ends.
- Choose wet or dry skimming based on your nutrient goals.
- Clean the cup neck often to keep foam production stable.
New skimmers often behave wildly at first. Manufacturing oils and fresh plastics change surface tension. This is normal. Resist the urge to tune it every hour. Let the skimmer settle. Then make small adjustments only once or twice daily.
Wet Skimming vs Dry Skimming
Wet skimming means the foam rises higher and collects lighter liquid. The cup fills faster. This removes more water along with waste. Wet skimming can help after heavy feeding, during a nutrient spike, or when cleaning up a neglected system.
Dry skimming produces darker, thicker waste. The cup fills more slowly. Many reef keepers prefer this for daily use. It removes concentrated organics with less saltwater loss. It also reduces the need for frequent cup emptying.
Neither method is always right. Your choice depends on the tank. If nitrate and phosphate are already very low, avoid overly aggressive wet skimming. Corals can pale in ultra-clean water. If nutrients are rising and algae is spreading, slightly wetter skimming can help. The goal is balance, not maximum waste removal at all times.
Water Parameters and Skimmer Performance
| Parameter | Recommended Range | Why It Matters |
|---|---|---|
| Temperature | 76-79°F | Supports oxygen stability and livestock health |
| Salinity | 1.025-1.026 specific gravity | Affects foam behavior and reef stability |
| pH | 8.0-8.4 | Improved gas exchange can support pH |
| Alkalinity | 7.5-9.5 dKH | Stable chemistry supports coral health |
| Nitrate | 2-15 ppm for many reefs | Skimming helps limit excess buildup |
| Phosphate | 0.03-0.10 ppm | Skimming reduces nutrient input pressure |
A skimmer works best in stable saltwater. Sudden salinity changes can alter foam production. Additives can also affect performance. Some foods, epoxy, medications, bacterial products, and water conditioners make skimmers overflow. This does not always mean the skimmer is faulty. It often means water chemistry temporarily changed.
Maintenance and Cleaning
Protein skimmers need routine cleaning. A dirty neck reduces foam rise. That lowers efficiency quickly. I recommend cleaning the collection cup and neck every two to four days. This small habit makes a big difference.
Every one to three months, do a full cleaning. Disassemble the pump. Soak parts in vinegar solution. Remove calcium buildup from the impeller, venturi, and air intake. Rinse well before reassembly. If the air line clogs with salt creep, bubble production drops. Many hobbyists miss this simple issue.
Watch pump sound too. A louder pump often means buildup or wear. Fixing it early prevents failure. Good maintenance keeps the skimmer consistent. Consistency matters more than peak performance for one day. A clean, stable skimmer does more for reef health than a neglected premium model.
Common Problems
Why is my protein skimmer overflowing?
Overflowing usually comes from one of five causes. The water depth may be too high. The outlet may be closed too much. The skimmer may still be in break-in. You may have added epoxy, food oils, additives, or medication. Or the cup and neck may be dirty.
Lower the internal water level first. Confirm sump depth next. Then check whether anything was added recently. If you used coral putty or a bacterial product, temporary overflow is common. In severe cases, raise the cup, open the outlet, or shut the skimmer off for a short period.
Why is my skimmer not producing foam?
This often happens in new tanks or lightly stocked systems. There may not be enough dissolved organics yet. It also happens when the air intake is blocked, the pump is dirty, or the skimmer is oversized. Check the venturi and airline for salt creep. Clean the pump and neck. Then give the unit time.
If the tank is very clean, weak skimmate may be normal. Do not force the foam level too high just to fill the cup.
Why does my skimmer performance change every day?
Daily inconsistency usually points to fluctuating sump water level. Use an auto top-off system if possible. It can also happen after feeding oily foods, dosing supplements, or cleaning the cup. A freshly cleaned neck often changes foam behavior for a few hours. That is normal. Stability returns as a biofilm develops.
Can a skimmer strip the tank too clean?
Yes, in some systems. This is more likely in lightly stocked reefs with oversized skimmers and additional nutrient export. Corals may pale. Growth may stall. Nitrate and phosphate may bottom out. If that happens, skim drier, shorten runtime, feed more, or reduce other export methods. Reef tanks need nutrient control, not zero nutrients.
Compatibility With Other Filtration
A protein skimmer works best as part of a full filtration plan. It pairs well with filter socks, roller mats, refugiums, carbon, and phosphate media. Each method handles waste differently. The skimmer removes organics before they fully break down. Mechanical filters catch particles. Refugiums consume nitrate and phosphate later in the cycle.
Be careful when combining aggressive export methods. A strong skimmer, large refugium, heavy carbon dosing, and phosphate remover can push nutrients too low. Test regularly. Adjust slowly. Let coral color and polyp extension guide you along with test kits.
For a balanced reef, think of the skimmer as one tool. It is not the whole system. Good husbandry still matters. Feed carefully. Stock responsibly. Clean pumps. Perform water changes. Stable habits will always beat expensive equipment used poorly.
Frequently Asked Questions
Should I run my protein skimmer all day?
Most reef keepers run it 24 hours a day. Continuous operation gives the most stable results. Some hobbyists reduce runtime in very low nutrient tanks.
Is a protein skimmer necessary for a nano reef?
Not always. Small, lightly stocked nano reefs can succeed without one. Regular water changes and careful feeding are more important there.
How long does a new skimmer take to break in?
Most need three to fourteen days. During that time, foam can be unstable. Avoid constant adjustments unless it is overflowing badly.
What color should skimmate be?
It can range from light tea color to dark brown. Wet skimming produces lighter liquid. Dry skimming produces darker, thicker waste.
Can I turn off my skimmer while feeding coral foods?
Yes, many hobbyists do. Turn it back on after fifteen to sixty minutes. This can reduce immediate removal of fine foods and amino products.
Final Tips for Better Skimmer Results
Choose the right size. Keep water depth stable. Clean the neck often. Make small adjustments only. Those four habits solve most skimmer issues. Do not judge performance by cup volume alone. Judge it by tank stability, nutrient trends, and livestock health.
If you are building a new reef, a protein skimmer is usually a smart investment. If you already own one, proper setup matters more than brand hype. A well-tuned midrange skimmer can outperform an expensive model that is oversized, dirty, or poorly placed.
For more reef filtration help, read our guides on reef tank filtration basics, reef tank sump setup, reef tank water parameters, and how often to do water changes in a reef tank.
Was this helpful?
Related Posts
Sump Setup Basics
Learn sump setup basics for a reef tank, including layout, plumbing, return pumps, water levels, and common mistakes…
Beginner Reef Tank Guide
Learn how to build a beginner reef tank with the right equipment, stable water, easy corals, and simple…