A sump adds water volume and hides equipment. Good plumbing makes it quiet, safe, and easy to service. These basics help you plan and build with confidence.
Plan your drains and returns first
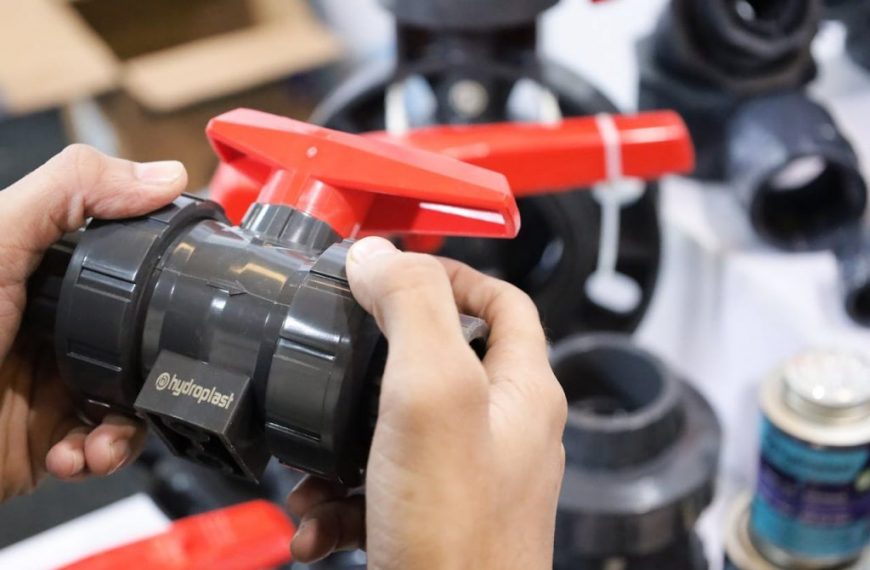
Start with your tank’s overflow style and hole sizes. Most reef tanks use 1 inch or 1.5 inch bulkheads. A common target is 3–5 times display turnover per hour through the sump. On a 75 gallon tank, aim for 225–375 gallons per hour.
Use a main drain plus an emergency drain when possible. A Herbie uses two drains and runs very quiet. A BeanAnimal uses three drains and adds extra safety. Keep the emergency line dry during normal operation. Test that it can handle full flow.
Match pipe size to bulkheads and avoid reducing early. Reducing too soon raises noise and clog risk. Use long-sweep elbows when you can. They cut turbulence and help prevent gurgling. Place unions near bulkheads for easy removal.
Plan access and service space before gluing anything. Leave room for filter socks, skimmer cup removal, and valves. A simple sketch helps. For sump layout ideas, see our sump design guide. For overflow styles, review overflow box basics.
- Target 3–5x display turnover through the sump each hour.
- Use unions at the pump, near bulkheads, and before manifolds.
- Keep the emergency drain straight and unrestricted.
Build a quiet, controllable system
Silence comes from stable siphon control. Put a gate valve on the main siphon drain. Gate valves allow fine adjustment. Ball valves are harder to tune. Adjust until the overflow water level stays steady.
Use a return pump that matches your head height. Measure from sump waterline to return outlet. Add 1–2 feet for fittings as a rough estimate. Many setups lose 20–40% flow to head pressure. Check the pump curve before buying.
Add a return union and a true-union ball valve. This lets you remove the pump fast. Consider a manifold for reactors and UV. Tee off the return with separate valves. Keep each accessory line small, like 1/2 inch.
Do not rely on check valves for flood protection. They can fail from sand, snails, or coralline. Instead, set your sump to hold backflow volume. Drill 1/8 inch siphon-break holes just under the return waterline. Aim the holes into the tank, not at lights.
- Use a gate valve on the main siphon drain for quiet tuning.
- Drill 1/8 inch siphon-break holes below the waterline.
- Size the sump to hold backflow during a power outage.
Leak testing, glue tips, and troubleshooting
Dry-fit every piece and mark alignment lines. Use PVC primer and cement on schedule 40 PVC. Push and twist a quarter turn, then hold for 10 seconds. Let joints cure at least 2 hours before water. Wait 24 hours for full cure when possible.
Freshwater leak test before adding saltwater. Fill the system and run it for 30–60 minutes. Check bulkheads first. Tighten by hand plus a small turn. Over-tightening can crack the gasket. Keep gaskets on the wet side of the glass.
If you hear flushing, the siphon is not stable. Open the gate valve slightly, then re-tune slowly. If you hear air slurping, raise the overflow level or reduce return flow. If microbubbles enter the display, slow the drain, add a bubble trap, or raise the skimmer outlet.
Watch for common mistakes. Flexible tubing can kink and restrict flow. Hard plumbing can transmit vibration. Use a short silicone tube section at the pump to reduce noise. For maintenance routines, see return pump maintenance.
- Leak test with freshwater for 30–60 minutes before adding salt.
- Hand-tighten bulkheads and keep gaskets on the wet side.
- Add a short silicone coupler at the pump to cut vibration.
Good sump plumbing is about control and safety. Plan drains for redundancy and tune for silence. Test for leaks and backflow before livestock goes in.
Sources: Reef Aquarium Volume 3 by Delbeek & Sprung; Bulk Reef Supply plumbing guides; PVC Schedule 40 installation guidance from major pipe manufacturers.